
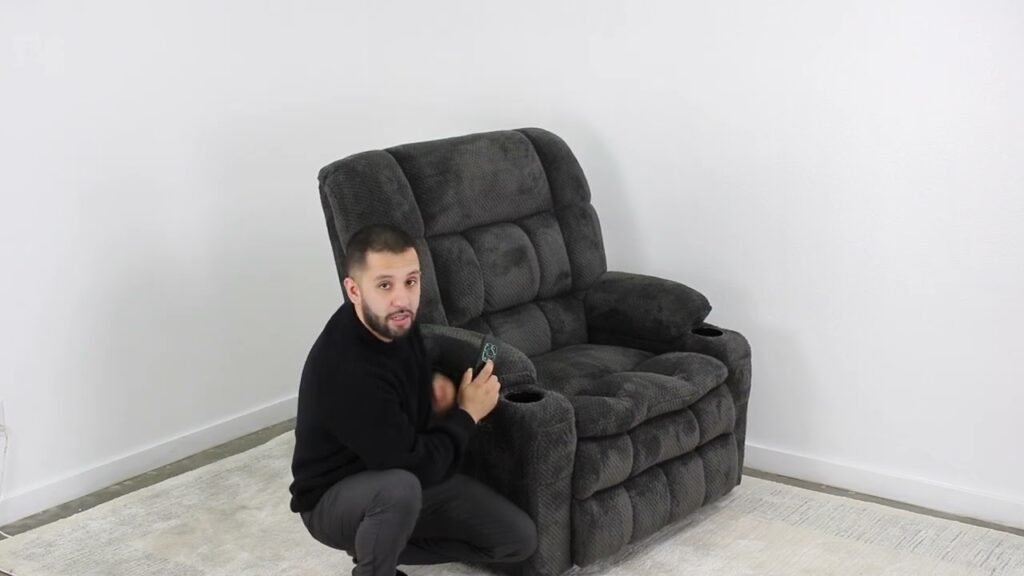
https://www.youtube.com/watch?v=HTzwI3KscCA — MCombo Lift Chair Summary and Key Takeaways
The MCombo lift chair is designed to help a seated person move toward standing, recline, and return upright. In the video, Mcombo demonstrates the dark-gray R7897DE, a model described as similar to the 7890, 7893, R7897, R7891, and R7894. The opening claim is that assembly takes less than minutes, provided all three boxes and the required hardware are present.
Watch the original Mcombo assembly and operation video for the visual sequence. From approximately 00:00 to 03:00, the creator shows the packaging, brackets, backrest, armrests, anti-tipping devices, and cables. Later, the demonstration covers the remote control, reclining function, heat, vibration, USB ports, cup holders, pockets, and control storage.
According to Mcombo, the MCombo lift chair is straightforward to assemble, but the video isn’t an independent test of weight capacity, waterproof rating, battery life, motor noise, stability, or long-term repairability. Before a purchase, confirm the exact model’s specifications, warranty, replacement-part availability, and retailer return policy because features can change between model years.

TL;DR: Key Takeaways Before You Assemble
The MCombo lift chair arrives in three boxes and uses slide-in brackets, bolts, wing nuts, and color-coded cables. As demonstrated by the creator, you shouldn’t need specialist tools when every component is included, although a second adult can make alignment safer and easier.
The most significant limitation is its intended use. This is a power lift recliner for a seated user—not a patient lift, floor lift chair, emergency recovery device, or floor-to-bed transfer system for someone who has fallen. The MCombo lift chair should be treated as stationary home-care furniture unless the manufacturer explicitly approves another use.
- Verify that all three boxes have arrived and inspect labels for an “additional boxes on the way” notice.
- Check the frame, brackets, bolts, cables, remotes, and anti-tipping hardware before assembly.
- Build the chair on a level floor, away from children, pets, and obstacles.
- Confirm that the backrest clicks securely into place and attach both anti-tipping devices.
- Test the lift remote, reclining function, heat, and vibration before normal use.
Keep the original packaging until the chair has been assembled, tested, and accepted. Read the supplied manual before using heat or vibration, particularly if you have reduced sensation or a medical condition affecting circulation.
What Comes in the Three Boxes
Before opening cartons, photograph the labels and compare them with your order. The video explains that box labels can indicate when other packages are still in transit, which prevents you from assuming a shipment is incomplete or reporting a missing component too early.
The MCombo lift chair is divided as follows:
- Box 1: bottom cushion or seat base.
- Box 2: backrest, instruction manual, and hardware box.
- Box 3: right and left armrests.
Retain every carton and insert. Mcombo specifically recommends keeping the boxes in case you move or return the chair. The MCombo lift chair may be difficult to repackage safely without its shaped cardboard and protective materials.
| Item | What to inspect |
|---|---|
| Brackets | Not bent, cracked, or obstructed |
| Bolts and wing nuts | Correct quantity and undamaged threads |
| Anti-tipping devices | Two devices, plus spare caps if supplied |
| Cables | Red, white, thin black, remote, armrest, and power leads |
| Remotes | Lift handset and heat-and-vibration handset |
If a color-coded cable appears absent, inspect inside the backrest before contacting support; the video notes that a lead can become tucked inside during shipping.


Assembly Guide: Arms, Backrest, and Anti-Tipping Hardware
Assembling the MCombo lift chair is mainly an alignment task. Place the bottom cushion on a level surface, then hold each armrest above its matching brackets. The creator uses the left arm as the example: align one bracket from the top, align the second, and press downward until the armrest is seated. Repeat the same method on the opposite side rather than forcing an armrest sideways.
Next, remove the protective covers over the backrest brackets and discard them. These covers protect the metal during shipping but can prevent the connection from engaging. Align one backrest bracket with the corresponding bracket on the seat base, then align the other side. Press down firmly until you hear the click that confirms engagement.
Install the anti-tipping hardware before plugging in the MCombo lift chair. Match the device’s two holes with the holes in the rear frame, pass a supplied bolt through each side, and tighten the wing nuts. Add the spare caps if they are intended for the exposed bolt ends.
- Check that both backrest brackets are fully below their catches.
- Confirm that no bracket is partially engaged.
- Verify that every bolt and wing nut is installed.
- Rock the base gently; it should not wobble on a level floor.
- Ask another adult to steady the chair if your mobility is limited.
Do not operate the chair if the backrest can lift away, a bolt is missing, or the base rocks. Those are installation faults, not conditions to “test out” with a user seated.
Cable Connections, Power, and Remote Controls
The MCombo lift chair uses wired controls and several connections between the backrest, bottom cushion, armrest, and power supply. As shown by Mcombo at approximately 02:10–03:20, match red to red, white to white, and connect the two thin black cables together. These links allow the chair’s mechanisms to communicate and operate together.
The lift remote controls raising, lowering, reclining, and the home or upright position. The second handset controls vibration zones, heat, intensity, modes, and timers. The video also shows a five-pin remote connection and a cable from the right armrest. Plug the chair’s power lead into the designated power connection, then route every cable away from moving joints, pinch points, and walkways.
The MCombo lift chair demonstration shows wired handsets, not a wireless handset or rechargeable battery system. USB ports should not be assumed to operate the chair during an outage. If battery backup matters, ask the seller whether a compatible rechargeable battery is available for the exact model.
- Unplug the chair before reseating any loose connection.
- Inspect the backrest for a cable trapped inside.
- Reconnect matching colors without twisting or forcing plugs.
- Test the handset only after the connections are secure.
- Contact Mcombo or the seller if the motor remains unresponsive.

How to Operate the Lift and Reclining Functions
To use the MCombo lift chair, sit centrally with your back against the backrest and keep both feet clear of the footrest gap. Hold the lift control to raise the seat toward a standing position. The home button returns the chair to upright from other positions, while separate controls let you raise or lower the base.
The reclining function may operate in stages. The upper control adjusts the backrest independently, and holding the relevant button long enough extends the footrest. Release the button when you reach the desired position rather than assuming each movement has a preset stop. In the video, the footrest begins rising first, the extension follows, and the mechanism stops at its maximum position.
For first use, place the MCombo lift chair several inches from the wall and clear space in front. Plug it in, test each movement in short increments, and confirm a full return to upright before using the maximum recline.
- Keep walkers, blankets, feet, hands, and pets away from the moving gap.
- Don’t push the chair while occupied unless the manufacturer expressly permits it.
- Don’t confuse this stationary electric lift chair with a portable lift chair on wheels.
- Stop immediately if movement is uneven, scraping, or unexpectedly noisy.
This device provides sit-to-stand assistance from the seat. It isn’t a transfer chair or a floor recovery system.
Heat, Vibration, and Everyday Features
The MCombo lift chair includes a separate heat-and-vibration handset. Its power control activates vibration, the heat button activates warmth, and zone buttons target the back, lumbar area, thighs, and legs. The creator demonstrates how to turn unwanted zones off individually—for example, leaving only back vibration active.
The MCombo lift chair remote provides three vibration intensity levels, three vibration modes, and 10-, 20-, and 30-minute timers. Heat can operate without vibration: switch vibration off while leaving the heat control active. If you have reduced sensation, circulation problems, diabetes, or another relevant medical condition, ask a clinician whether heat is appropriate and check your skin regularly.
Everyday features shown from approximately 05:35 to 06:10 include two cup holders, side pockets, control hooks or belts on both arms, dual USB ports, plush fabric upholstery, and several colors and sizes. These features improve convenience, but they don’t establish durability or water resistance.
- Check the exact upholstery care instructions before applying cleaner.
- Ask whether the fabric is stain-resistant or has a waterproof rating.
- Clean spills promptly instead of assuming the upholstery is waterproof.
- Don’t overload cup holders or pockets, especially while the chair is moving.

Safety: Who Should Use a Lift Recliner—and Who Needs Another Device?
The MCombo lift chair is intended for a person who can sit safely while the powered base raises the seat to assist standing. It isn’t a floor lift chair, patient lift, or emergency recovery device for somebody lying on the floor. The creator demonstrates seated lift movement, not a fall response or floor-to-bed transfer.
If someone has fallen and cannot stand, don’t place them in the recliner or attempt to pull them into it. Call emergency services when injury may be present, and use a professionally assessed patient lift or floor-lift device when appropriate. A chair lift for elderly users still requires the person to be positioned safely in the seat.
During early transfers, position the MCombo lift chair against a stable surface, remove or secure the walker before movement, guide the user’s hips fully back, and keep hands on the armrests rather than near moving joints. Stay present during initial sit-to-stand trials.
Seat belts, handrails, and suction cups may belong to particular transfer chairs or portable lift products, but they aren’t shown as standard components here. Never add aftermarket restraints without manufacturer approval. Before use, learn how to stop movement during an emergency and ask whether manual lowering or a rechargeable battery backup exists; the video demonstrates neither feature.
Fit, Accessibility, and Buying Criteria for an MCombo Lift Chair
Measure before ordering an MCombo lift chair. Record hip width, seated knee-to-heel length, and floor-to-knee height, then compare those numbers with the exact model’s specification sheet. A product-family name isn’t enough because seat dimensions, weight capacity, rise angle, and recline positions can differ.
- Seat width and depth: allow support without forcing the knees outward.
- Seat-to-floor height: make sure feet can contact the floor before rising.
- Armrest and back height: check transfer support and head comfort.
- Leg and footrest length: avoid unsupported calves or a footrest pressing behind the knees.
- Room clearance: measure behind the backrest and in front of the footrest.
- Capacity: verify the exact stated weight capacity rather than estimating it.
A short user may need a smaller seat and shorter footrest, while a tall user may need longer head and leg support. Wheelchair and walker users also need transfer clearance beside the armrest. The MCombo lift chair should be judged on fit, not just color or price.
Beyond the listing, listen for motor noise, inspect stitching and brackets, test the stabilized base on a level floor, and ask whether motors, remotes, and cables are replaceable. A portable lift chair with wheels may help with short-distance transport; a transfer chair or foldable design may suit another need, but wheels and folding can affect stability and comfort. Independently verify capacity, battery life, waterproof claims, warranty records, and real-world stability through reviews, hands-on testing, retailer policies, and clinician advice.
Best Lift-Chair Videos by User Intent
The MCombo lift chair video is best for assembly and basic operation. It shows the three-box packaging, bracket alignment, cable matching, anti-tipping hardware, lift movement, recline, massage controls, cup holders, USB ports, and storage in roughly seven minutes. According to Mcombo, the R7897DE shown is similar to several related models, but you should still compare model-specific instructions.
For shopping decisions, choose a review-focused video that tests comfort, seat dimensions, upholstery, motor noise, actual weight capacity, warranty, and long-term reliability. Those tests are outside the scope of the demonstration. If your shipment seems incomplete, an unboxing or setup video can help you interpret box labels, especially during the 00:18–00:45 packaging segment.
Troubleshooting videos or manufacturer support content are more useful for remote failure, stuck footrests, missing cables, unusual sounds, and power interruptions. Model-specific instructions should outrank generic advice.
When comparing any video about the MCombo lift chair or similar products, ask:
- Is the presenter testing a seated lift recliner, floor lift chair, patient lift, or transfer chair?
- Is a real user shown, with caregiver assistance where needed?
- Does the presenter test stability, emergency stopping, and transfer technique?
- Are performance claims measured, or merely repeated from a listing?
First-Week Testing, Maintenance, and Troubleshooting
During the first week, test the MCombo lift chair before discarding packaging. Run three complete lift and recline cycles while unoccupied. Then repeat the test with the intended user under supervision, checking for bracket movement, cable strain, uneven motion, excessive motor noise, and footrest misalignment.
Test every lift-remote button, both vibration controls, heat, all three timers, both USB ports, cup holders, side pockets, and the control hooks. Operate each vibration zone and verify that unwanted zones can be switched off. The MCombo lift chair should stop smoothly when you release a control.
- No power: check the wall outlet, power connection, and plugs after disconnecting the chair from electricity.
- One function fails: inspect the relevant remote and cable, including the five-pin connection.
- A cable is missing: look inside the backrest because a color-coded lead may be tucked away.
- Abnormal movement: stop use, keep the user out of the chair, document the fault, and contact support.
Keep fabric dry, avoid overloading storage areas, and prevent cables from rubbing against moving mechanisms. Periodically inspect bolts and anti-tipping devices. For home care records, photograph the model label, save the manual, record the purchase date, retain box labels, and photograph or describe any fault before requesting parts or warranty service.
Final Decision Checklist for MCombo Lift Chair Buyers
The MCombo lift chair may suit someone who can sit safely but needs sit-to-stand assistance, controlled reclining, and home-care comfort. Correct sizing, a level stabilized base, adequate clearance, and supervised first transfers matter as much as the motorized features.
Look elsewhere if you need floor recovery, a floor-to-bed transfer, frequent short-distance transport, a foldable design, wheels, seat belts, handrails, suction cups, or a clinical patient lift. Those needs call for a purpose-built device and, often, professional assessment. The MCombo lift chair isn’t a substitute for a patient lift after a fall.
- Measure the user and room.
- Confirm the exact model, dimensions, rise angle, recline positions, and weight capacity.
- Verify battery-backup options, emergency lowering, warranty, and repairability.
- Compare independent tests of stability, motor noise, upholstery, and long-term use.
- Arrange caregiver supervision for the first transfer and movement test.
The creator’s practical takeaway is clear: the chair is relatively simple to assemble and offers lift, recline, heat, vibration, storage, cup holders, and USB charging. Safe use depends on correct installation and recognizing its limits. For visual confirmation, revisit the original Mcombo demonstration, then check current manufacturer documentation before buying in 2026.

Key Takeaways
- The chair arrives in three boxes and can usually be assembled with slide-in brackets, color-coded cables, bolts, and wing nuts.
- A lift recliner is for seated sit-to-stand assistance, not floor recovery, patient transfers, or moving an injured person after a fall.
- Measure the user and room carefully, then verify the exact model’s capacity, clearance, battery backup, warranty, and repairability.
- Test the brackets, anti-tipping devices, remotes, lift cycle, recline, heat, vibration, USB ports, and footrest during the first week.
- Use the original Mcombo video for visual assembly guidance, but independently verify claims the demonstration does not test, including stability, waterproofing, battery life, and long-term durability.
Frequently Asked Questions
What is the best lift chair recliner on the market?
There isn’t one best lift chair for every user. The right power lift recliner should fit the user’s hip width, leg length, height, mobility needs, room clearance, and verified weight capacity, while also offering acceptable warranty and repair support.
Will Medicare pay for a lift chair for a senior?
Medicare coverage can be limited and may apply only to the lifting mechanism under specific medical-necessity rules, not the entire chair. Confirm current eligibility, documentation requirements, and supplier rules with Medicare or a qualified benefits adviser before purchasing.
What are the most comfortable lift chairs for seniors?
Comfort depends on seat depth, width, cushioning, lumbar support, footrest length, upholstery, and recline angle. Test the exact size when possible, because a chair that’s too deep for a short user or too short for a tall user can create pressure and poor support.
What are the best lift chairs for elderly according to Consumer Reports?
Consumer Reports’ recommendations can change and may not cover every Mcombo model or current model year. Use any published testing alongside hands-on evaluation of fit, stability, motor noise, warranty, capacity, and replacement-part availability.
Is the MCombo lift chair a patient lift for someone who has fallen?
No. It assists a person who is already seated and able to participate in standing; it isn’t a floor lift chair, emergency recovery device, or floor-to-bed transfer system. A fall involving possible injury requires emergency assessment and may require a professionally selected patient lift.
